|
“A Rose”
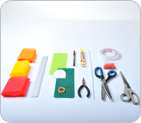
This lesson will create one flower.
|
|
|
|
|
|
|
|
|
|
|
|
Leaves
Cut one piece each of Dark Green Smart-Fab and Apple Green Smart –Fab 3 inches x 8 inches.
Layer the pieces on top of one another and trace the “Leaf Pattern” on top of them. Cut out the two leaves.
|
|
|
|

|
|
PROCEDURE
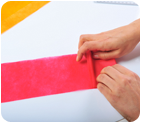
1. Measuring with a ruler, use a pen or marker to mark the two strips of Red Smart-Fab at 2 ½ inch intervals. |
|
|
|
|
|
2. Using the marks you have just made, fold each strip of Red Smart-Fab back and forth accordion style. After folding you will have two rectangles 2 ½ inches by 3 ½ inches. |
|
|
|

|
|
3. Place the “Rose Petal” pattern onto the top of each of the two folded rectangles along the bottom edge that measures 2 ½ inches wide. Use the pen or marker to trace the pattern onto the rectangles. |
|
|
|

|
|
4. Following the outline you have drawn, cut out the two “Rose Petals” strip only along its top part. Be careful not to cut down the folded sides. This will cut the strips into pieces. |
|
|
|

|
|
5. Unfold the two strips of “Rose Petals”.
|
|
|
|

|
|
6. Lay the two strips of “Rose Petals” on top of one another, staggering them slightly, so that they alternate in height, like two sets of waves. |
|
|
|
|
|
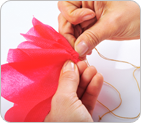
7. Using needle and thread, attach the two overlaid strips to one
another. Use “over-under” basting stitches along the entire length
of the lower broad edge of the “Rose Petal” strips.
|
|
|
|
|
|
8. As you are sewing pull the thread to create a rounded shape.
|
|
|
|

|
|
9. Knot and cut off thread.
|
|
|
|

|
|
10. To form the “Rose”. Begin at one end of the strip of the sewn “Rose Petals”. Hold the strip tightly from the sewn part (bottom) of the Smart-Fab, and turn and wrap the strip around itself to form a “Rosebud” shape. |
|
|
|

|
|
11. Continue to turn and wrap the strip. Using fabric glue or a small piece of double sided adhesive tape, glue the “Rose” together at intervals until you have wrapped the entire strip of “Rose Petals. |
|
|
|

|
|
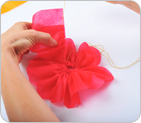
12. You now have a Rose. You can turn the ‘Rose Petals’ down to have a full blooming flower or leave them closed for a “Rosebud”.
|
|
|
|

|
|
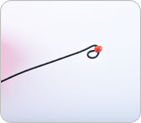
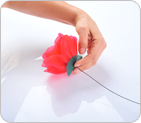
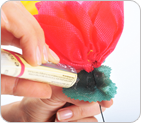
13. To attach the stem to the “Rose” you will need the prepared piece of green wire with the bead at the end. Push the wire, with the bead at the top, through the underside of the “Rose” until the bead and some of the “Stem” can be seen above the flower. |
|
|
|

|
|
14. Once the wire is in place you need to create a “stopper” so that the wire will not slip out of the flower. Do this at the underside of the “Rose” by either twisting the wire with the pliers to create a knot, or use a”Crimp Tube”. After you have made the “Stopper” push it up into the flower to secure it. |
|
|
|
|
|
|
|
16. Glue the Green Smart-Fab circle to the bottom of the “Rose”.
|
|
|
|

|
|
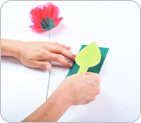
17. The last step is to attach the leaves to the stem. You need to first glue the two leaves together with fabric glue. Before gluing them together, stagger the leaves so that both colors can be seen. After gluing them together put a small amount of double-sided tape on the bottom of the leaves and wrap them around the stem. Use some fabric glue to secure them tightly to the stem. |
|
|
|
|
|

|
|
Enjoy making a colorful bouquet with another “Smart-Fab Flower”!
|
|
|
|