|
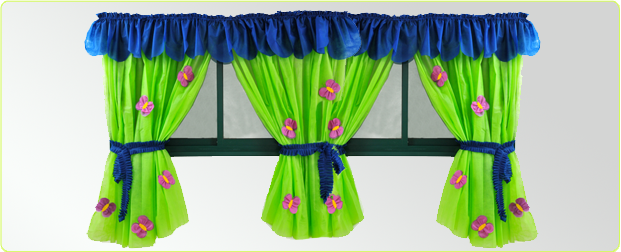
“Colorful Curtain”
Decorate or create colorful windows in the classroom!
In this lesson, we selected Apple Green and Dark Blue “Smart-Fab - you can choose any colors you like!
|
|
|
|
“THE SET-UP”
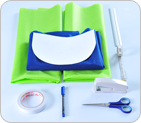
Materials:
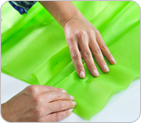
- Two large pieces of Smart-Fab to be used for the two “Pleated” hanging parts of the curtain. (We are using Apple Green Smart-Fab.) They should be large enough to fit measurements described below.
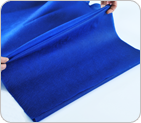
- Another large piece of Smart-Fab in another color for the “Valance” (top decorative part of the curtain) and two strips to create the “Swags” on the sides of the curtain. (We are using Dark Blue Smart-Fab.) They should also be large enough to fit measurements described below.
- Measuring tape
- Scissors
- Stapler
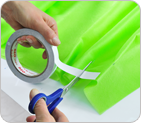
- Double sided adhesive tape
- Needle and thread (optional)
- Pencil or marker
- “Half Circle Pattern” (print out here)
- “Butterfly” (click for "Butterfly" lesson plan)
- “Decorative Flower” (click for "Decorative Flower" lesson plan)
|
|
|
|

|
|
Preparations:
- Measure your window or the space where you want to decorate with a “Curtain”.
- Use this measurement for the two “Pleated” hanging parts of the curtain. Each piece should measure the entire width of the space and the length. We are using two pieces of Apple Green Smart-Fab four feet wide by three feet- eleven inches long. (You may have a different measurement. Be sure that the width of your strip can be divided by two inches evenly.) Cut your pieces to size.
- Take the second Smart-Fab color you have chosen. You will need to measure and cut one strip for the “Valance” of your curtain. We are using a strip of Dark Blue Smart-Fab five feet wide by fourteen inches long (You may have a different measurement. Be sure that the width of your strip can be divided by ten inches evenly.) You will need two additional strips in this color to use to tie back “Swags” on the sides of the curtain. Cut two strips three feet, nine inches, by five inches.
- Print out “Half Circle Pattern”
- Print out “Butterfly” and/or “Decorative Flower” Lessons and prepare them.
|
|
|
|

|
|
PROCEDURE
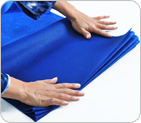
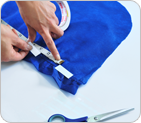
1. Take the two pieces of Smart-Fab that you will use to make the “Pleated” hanging part of your curtain. Using a pencil or marker, measure along the top part of the width of both pieces of Smart-Fab making a mark at every two inches. |
|
|
|

|
|
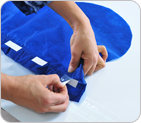
2. At every other two inch marking, create a “Pleat” that is also two inches deep (this will be the two inch mark in between) and staple. Complete this procedure on both pieces of Smart-Fab. |
|
|
|
|
|
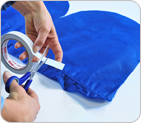
3. To flatten the top part of the “Pleats”, cut a small piece of double- sided adhesive tape to fit down one side of your currently raised “Pleat”. You will be folding all the “Pleats” down in one direction. Cut all the small pieces of tape to fit down one side of each “Pleat” on both pieces of the hanging part of your curtain. |
|
|
|
|
|
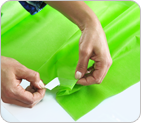
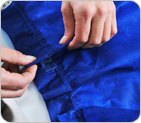
4. When all pieces of double- sided tape have been fitted onto one side of each “Pleat”, remove the covering of the double- sided tape. Fold and Flatten the first “Pleat” down toward the “Pleat” next to it. |
|
|
|
|
|
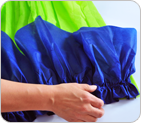
5. Each “Pleat” needs to be folded and flattened down right up against the next “Pleat” so that there is no space in between. It should be that as you fold and flatten, you will notice that you are meeting the “two inch” marks in between your “Pleats”. |
|
|
|

|
|
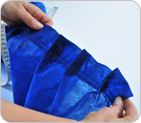
6. Continue to fold and flatten the “Pleats” all the way across both pieces of Smart-Fab, creating the two hanging parts of your curtain. Smooth the “Pleats” all the way down the length of the two hanging parts of the curtain.
This procedure can also be accomplished by pinning each “Pleat” down and sewing across the top of your two pieces of Smart-Fab.
|
|
|
|
|
|
7. To create the “Valance” of the curtain, take the five feet wide by fourteen inch long strip of the other color of Smart-Fab, and, using a marker or pencil and a tape measure, make a mark along the width at ten inch intervals. |
|
|
|
|
|
8. Fold the strip “accordion” style at each ten inch mark until you have a rectangle ten inches by fourteen inches. |
|
|
|

|
|
9. To round one end of the rectangle use the “Half Circle Pattern”. Take the half circle pattern and trace with the rounded edge touching one end of the ten inch part of the rectangle. Only trace the rounded edge of the circle connecting it to the sides of your Smart-Fab. |
|
|
|

|
|
10. Cut along the rounded edge of the tracing you made and meet at the edge of the fabric.
Only cut the top rounded part. Do not cut down the sides because you will cut up the strips.
|
|
|
|
|
|
11. To make small “Pleats” at the top of your “Valance”, measure and mark two inch intervals all the way across the length of the straight side of your Smart-Fab. Then, cut enough one half inch strips of double sided adhesive tape to fit on all the marks you have made. |
|
|
|
|
|
12. Place the adhesive strips on top of the mark you made so that half of the adhesive strip is on one side of the mark and half on the other. |
|
|
|
|
|
13. Remove the coverings of the tape and from the underside of the Smart-Fab. |
|
|
|
|
|
14. “Pinch a Pleat” together where you have each piece of tape. Smooth each “Pleat’ down as you create it. |
|
|
|
|
|
As mentioned above these “pleats for the “Valance” can also be pinned and sewn into place. |
|
|
|
|
|
15. Use double sided adhesive tape to attach your “Valence” across the top of the hanging parts of your curtain. |
|
|
|

|
|
16. Thumb-tacks or double sided tape can be used to hang the “Curtain”. When the curtain is in place, use the two additional strips of Smart-Fab, three feet, nine inches, by five inches to tie back the “Swags” in your curtain. Pull the “Pleats” straight on the hanging pieces of your curtain and decorate with Smart-Fab “Butterflies” and/or “Decorative Flowers”. |
|
|
|